

Getting creative this Halloween: How to create a unique Halloween costume
Earlier in October we gave you a variety of cheap and easy costume ideas, while also introducing three totally unique costumes with the promise of providing you with the how-to. If you’re interested in how to create these special Halloween costumes, then read on. Following we’ll be explaining how to create the plane, the train, and the automobile.I sat down with dad of four, Brian Amestoy, to get the inside scoop on how he went about creating these three original costumes for his children. Taking a ‘go big or go home’ kind of attitude in making these one-of-a-kind creations, Brian started with the plane, ended with Lightning McQueen, and notes that the train was the biggest challenge.
Whether you’re going plane, train, automobile, or something your own imagination inspired here are the supplies you’ll need to get started:
- Gorilla glue – Three costumes and multiple Halloween appearances later, and each creation has held together with this adhesive. *Note: If you’ve never used gorilla glue before, it tends to foam quite a bit, so be prepared for that and the possibility of a thicker line.
- Large pieces of flat cardboard – Being an electrician, Brian was able to secure his cardboard from job sites, but you might check into big box stores, recycling facilities…
- Heavy duty suspenders
- A small piece of wood – This will help secure the suspenders to the costume, so the cardboard won’t tear out.
- Spray paint
- Permanent marker – For your outline work
- Razor Knife
You’ve got your supplies; next comes the design process. Once Brian got a picture in his head of how he wanted the costume to look, he hit Google (or Bing or whatever search engine you favor) to get a picture he could use as a blueprint of sorts.
Using the picture as a guide, Brian drew - freehand – the pattern he would use for the body of each costume, starting with the sides first – leaving space for your trick-or-treater in the middle.
Plane:
Attach sides to nose and midsection
Attach wings
- Attach tail/cut hole to slide tail through end
- Attach/slide in propeller or add a little mobility and attach the propeller so that it could rotate.
- Spray paint to your color preferences – blocking off sections you’ll be painting different colors.
- Using your small, square of wood for reinforcement, attach suspenders
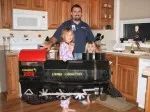
Train:
There are more parts to the train then either of the other costumes and it required a great deal more work in creating the proper shape. In addition to the above mentioned supplies, you’ll also need:
- Pie plates (the bigger wheels and front)
- Cylinders of some kind (soup cans, cups painted…)
As with the plane, you’ll create the body first, working up and out from there. It’s important to note that with the train you have more shaping going on. Brian said he “scored” the cardboard (made a light cut) that enabled him to fold and shape the front, body, and cab of the engine to his preference. This will probably take some trial and error, working until you get the shape you want.
Car:
The car, as with the train has some shaping with the hood, but not nearly to the same degree. Brian went with Lightning McQueen, but certainly you could go with your favorite race car driver and really get creative. Note that he attached the wheels at an angle in order to create the illusion of movement as well as painting the tire well black.
Follow the same steps of creating your body then finishing up with any additional add-ons and painting to your design specifications, and you've got yourself a race-car driver.
With the right amount of time and creativity you can absolutely create a memorable costume for your child as well. Which Halloween costume will you be trying?
Keep up with Simply Becca on Facebook: Parenting, Kid Talk, and TV Moms or on Twitter @LovingAbigail.