
Creating beautiful bouquets straight from the yard
I love having fresh flowers in my home. But purchasing flowers can get pretty pricy, and the arrangements that I make with store-bought flowers often feel flat and dull. I prefer a wilder, more natural look.I’ve started turning to what’s just outside my front and back doors to bring some living beauty into my home, and the results have yielded more than just a pretty centerpiece. I’ve found a creative and therapeutic outlet and an activity I enjoy doing alone or with my child.
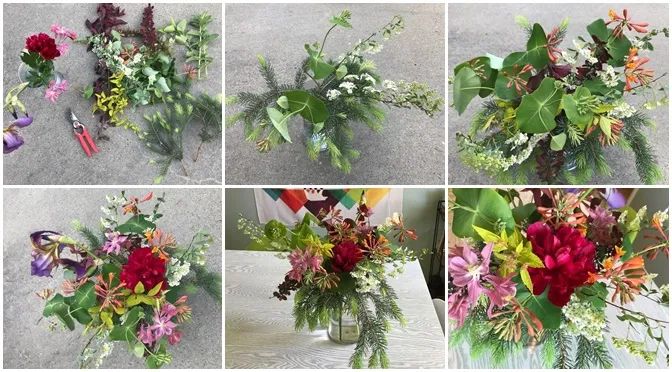
How to create your beautiful backyard bouquet
To get started creating your own backyard bouquets, all you need are some small pruning shears (or scissors that you don’t mind getting dirty) and a container or vase of your choosing (I’m all about some good ol’ mason jars!).
Make sure your container is clean and fill it with cold water. This helps preserve the vase life of your living creation. With pruning shears in hand, start going around the yard collecting clippings.
Don’t worry if you don’t have an abundance of blooms to pick. In fact, utilizing greenery is one of the keys to making great yard bouquets. In every arrangement, you want to have a good mix of color, texture, and height. You don’t want everything to be uniform. I always make sure to grab a good mix of:
- Foliage with an interesting texture
- Foliage with a unique color pop
- Some type of flowering branch (lots of little flowers vs. one focal flower)
- Herbs or something with a good scent
- One or more focal flowers
- Supporting flowers (these aren’t show-stoppers, but they add color and texture)
Once you’ve collected your bounty, it’s time to get started.
- Place any delicate flowers or foliage immediately into the cold water to prevent drooping.
- Remove the bottom leaves / flowers / needles from each piece so that you’ll have only stem in the water. Leaves in the water will rot and give you a very short vase life.
- Start creating a foundation with more lengthy foliage. This will give your arrangement good width and height.
- Start to add pops of color and texture to fill in the gaps. At this step, it’s good to keep two things in mind: (1) Don’t try to be a perfectionist! You want this to look wild and natural. (2) Try to maintain good balance and shape, but not perfect symmetry.
- Insert your focal flower(s) in a way that features it and puts it on full display.
- Add any last touches of height to balance out the shape of the arrangement.
about the author...Anna Rogers is a transplant from the Carolinas with a background in marketing and graphic communications. She is a wife and mother who loves to garden, cook, and practice yoga. Anna is passionate about travel, which at its core is really a passion for people, as she believes people and community are what truly bring life and beauty into a place. www.piazzamktg.com