
DIY: Valentine's Day Heart String Art
Love is in the air and that means it’s time to think about adding some LOVEly touches to the home! This heart string art project is so much fun to make and for less than $10.00 in supplies it’s also a pretty sweet deal. Here’s how to create one for your home.Supplies:
- Wood plaque
- Tacky glue
- Mod podge and foam brush
- White acrylic paint
- Scissors
- Embroidery thread in color of your choice
- Scrapbook paper and paper trimmer
- Nails and hammer
Steps:
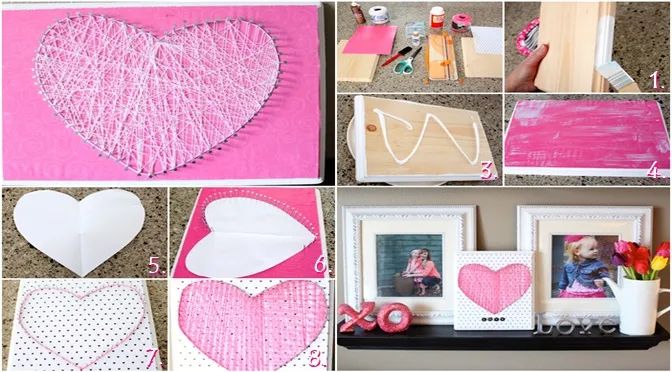
- Start by painting the outside edge of the wood plaque with white paint and let it dry.
- Trim scrapbook paper to fit on plaque.
- Apply tacky glue to the top of plaque and spread it out evenly with foam brush. Place paper on plaque and press into place while smoothing out air bubbles with fingertips or a rolling pin.
- Brush on a topcoat of mod podge and allow to dry.
- Make a heart shaped template to use as a guide for your nails.
- Nail paper heart template into place on top and bottom and begin hammering nails all the way around it.
- Tie string in a double knot to one of the nails and begin wrapping it around the outside of the heart.
- Now start either making a pattern while wrapping thread around each nail or randomly string it around. As you can see, the pink thread heart is in more of a pattern and the white thread heart is more random. There’s no wrong way to do it.
- When you feel like your heart is filled in how you like it, tie the end of thread into a double knot, secure in place and trim the ends of the thread.
- Finally, press the string down on the nails and pound the nails in a bit more to make sure they are well secured.
I plan to make more of these with my kids. They can pick out their own pattern and with a little help hammering in the nails they will have so much fun with it! For more Valentine décor inspiration, check out my Lucky in love garland and sparkling X’s and O’s projects from last year.