
DIY Tooth Fairy Pillow
When you have kids the Tooth Fairy is a big deal! It’s not long after the first wiggle sets in that the who, what, when, where begins…Who is the tooth fairy? Where does she live? When will she get my tooth? What will I get in exchange? According to my daughter, the Tooth Fairy is her dad. She very matter of fact told her friend that and her friend went home and told her parent the news: "My friend said her dad was the Tooth Fairy!" Her parent, "Well, that does make sense don't you think? He works at the bank." Regardless if my husband is the Tooth Fairy or not, the excitement never dies when that loose tooth comes out and the anticipation of a wonderful surprise is exchanged for their pearly white. What better way to send it off to "Tooth Fairy Land" than to be snugly tucked away in a Tooth Fairy Pocket Pillow?In preparation (and celebration) of National Tooth Fairy Day – February 28 - we’ve provided a step-by-step tutorial for sewing your own Tooth Fairy Pillow!
Supplies:
Apart from the usual sewing supplies of a sewing machine, matching thread, straight pins, fabric scissors, ironing board and iron, you'll need the following:
- 9"x 9" or other desired size piece of printed fabric of choice
- 5"x 5" or other desired size piece of coordinating solid color fabric
- Small piece of white felt cut into the shape of a tooth
- Black embroidery thread
- Pink fabric marker
- Poly stuffing
- 1 yard of 1"- 1.5" wide ribbon of your choosing
Instructions:
Step 1:
Cut your fabric to desired size. Note: This part is all preference, you can do it bigger or smaller depending on if you want to hang it, put it under a pillow, or put it on a bed.
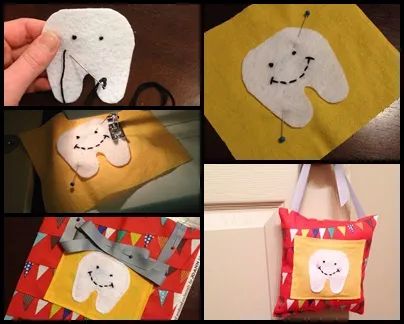
Step 2:
Embroider the tooth's face. I use a fabric pen with disappearing ink to mark my stitches. You'll want to use a French knot to do the eyes (here is a great instructional clip on the how to do a french knot) and a basic straight stitch for the mouth.
Step 3:
Using a straight pin, pin your tooth to the pocket piece and top stitch it.
Step 4:
Sew the top edge of your pocket fabric. Then, iron in the edges of the pocket fabric to be top stitched onto the pillow fabric.
Step 5:
Using straight pins, pin the pocket face up onto the pillow fabric and top stitch the sides and bottom.
Step 6:
Cut ribbon into two pieces (I melt the ribbon edges with a match to keep from fraying) and pin in place. If you're making a bigger pillow for a bed, skip this step.
Step 7:
- Pin pillow pieces, right sides together and sew edges (I usually do 1/2" seam) leaving a 4" opening at a bottom corner to turn right side out.
- Pull out your pins and cut the corners to give the pillow corners a finished look.
- Turn the pillow right side out, remove the rest of the pins and reshape.
- Use the eraser end of a pencil or, if you don’t have one, I like to use a plastic chop stick to help get the corners set and the pillows shaped.
Step 8:
- Time to stuff the pillow!
- Pin the bottom seam and top stitch the closing.
- Last but not least, use a pink fabric marker (I bought mine over at Hobby Lobby for a few dollars) and color in some blushing cheeks.
 Step 9:
Now go have some fun and fill that pocket with a tooth fairy treasure!
About the author...Rebekah is new to the Simply Family team. She is a dance teacher, mother of 2 and creative soul. She enjoys cooking, baking and creating with fabric and paper.